Wednesday, June 30, 2010

Flan -- A Spanish Delight


July 1 is the feast of Blessed Junipero Serra, a Spanish missionary, so well known for evangelizing in California and Mexico. He battled cold, hunger, and illness, as well as those who would challenge him in the battle for souls. You can find a simple biography of him here.

Celebrate his feast day with a sweet Spanish treat -- Flan (pronounced flahn), a sweet custard dish with a caramel base.
This dessert is a little intimidating the first time you try it, but once you've done it one time, it's a breeze to put together. The final result, however, is a big "wow." Not only the presentation, but the taste. The "burned" sugar really flavors this dish and it's such a unique flavor. I make individual flans, because I have some lovely ramekins, and the kids like "their own." But, it is just as good made as a big flan, just use a shallow ceramic or glass dish. Start far enough ahead that the Flan can chill completely before serving.

This is a delightful dish that can be served for any Spanish feast day.


Flan
from
The Joy of Cooking

3/4 c. sugar
1/4 c. water
5 large eggs
3/4 c. sugar
1/8 t. salt
3 c. whole or low-fat milk
3/4 t. vanilla

Preheat oven to 325 degrees F. Place 3/4 c. sugar in a small, heavy saucepan. Drizzle water evenly over the top. Place the pan over medium heat and, without stirring, very gently swirl the pan until a clear syrup forms. It is important that the syrup clarify before it boils, so move the pan off and back on the heat if necessary. After the sugar dissolves, raise the heat to high and bring the syrup to a rolling boil; cover the pan tightly and boil for 2 minutes. Uncover the pan and cook the syrup until it begins to darken. Gently swirl the pan by the handle and cook the syrup until it turns a deep amber. Quickly pour the syrup (be careful -- it will blister you if you touch it) into eight 6-oz. ramekins or custard cups or a 2 to 2-1/2 cup dish. Using a potholder, immediately tilt the dish(es) to coat the bottom.


In a bowl, whisk the eggs, sugar and salt, just until blended. Heat the milk just until steaming and gradually whisk hot milk into egg mixture. Stir gently until sugar is dissolved. Stir in vanilla. Pour egg mixture into ramekins or dish. Place in a large baking dish or roaster and place in the oven. Pour hot water into the pan, carefully avoiding the flan dish(es), about halfway up the sides of the cups or dish. Bake 40 to 60 minutes for individual cups and 60 to 90 minutes for a large dish. They should be firmly set in the center.


Refrigerate for at least 4 hours or up to 2 days. To unmold, run a knife around the edges and flip onto a plate (it helps if you put the plate upside down directly on top of the dish -- especially if you made a large flan). If necessary (for really stubborn ones) dip the bottom of the dish briefly into hot water.

Tuesday, June 29, 2010

Fried Fish in Honor of the Fishers of Men


Today, June 29, is the feast of Sts. Peter and Paul, two of the Church's greatest apostles and fishers of men. In honor of this feast, we will be enjoying some beer battered fried fish this evening. This recipe is fun and easy and the kids can help.

Ingredients:
2 lbs. fish filets, dried with a paper towel and seasoned with seasoning salt
1 container shake and pour buttermilk pancake mix
1 cup beer
oil for frying (about 1 in. deep in large fryer)

Directions:

Pat fish filets dry, season, and set aside. Add beer to pancake mix in place of water as directed. Shake well. (You can play with the amount of beer for desired consistency.) Pour batter into shallow bowl. Heat oil in large frying pan, dip fish in batter until coated and place in pan. Fry on each side until golden brown (aproximately 3-4 minutes). If batter begins to brown too quickly, reduce heat. Drain on fish on paper towels after removing from oil.

You can mix ketchup and a bit of horse radish for a dipping sauce, reminding us of St. Paul's conversion story, and then, maybe serve up a bit of Key Lime Pie for dessert, since Jesus entrusted Peter with the keys to the Kingdom.

Blessed feasting to you all.

Sunday, June 27, 2010

PinkyBerry High-Tea

This will be a long post that consists of 3 short recipes that might come in handy for any teatime treat. Since recently there is a lot of fresh and nice strawberry available at the supermarket, I really cannot resist the temptation to get a box too. And moreover, I also wish to do a post of “PINKY” theme whereby I can include a few short and sweet recipes for my guests. So here you go…….. welcome to my “PinkBerry High-Tea”……

For starter, let's have a cup of Berry Smoothie to cool down from the summer heat. Smoothie is a blended beverage made from fresh fruit (fruit smoothie) or vegetables. In addition to fruit, some smoothies might include crushed ice, frozen fruit, honey, yogurt or fresh milk. This "Berry Smoothie" here is pretty easy to whip up, what you require are:- fruit blender, some strawberries, honey(optional) and fresh milk.

Ingredients: (serves 2 - 3)
5 - 6 Medium Size of Strawberries
200ml of Strawberry Milk
50ml of Fresh Milk
1/2 Tablespoon Honey, optional

Method:
1. Rinse and trim the strawberries, cut it into halves then blend it together with fresh milk and honey till smooth and creamy.
2. Transfer it to serving cups and top with extra strawberry slices as garnish.

Note:
~ You can use mixture of strawberry & plain milk or either one type for this smoothie.

Chocolate usually goes pretty well with strawberry as it perfect it with an extraordinary flavour. It is not difficult to make this beautiful treats, but you may take a bit of practice on how to dip and yet not drop the strawberries in the melted chocolate.

After our Berry Smoothies, let's have some Chocoberry to start off this afternoon high-tea. These are some easy to make and yet presentable sweet treats whereby you can impress your guest with different kind of decoration design. I am sure this will help you to score more points no matter your guests are Kids or Adults, they will definitely loves these.

Ingredients: (serves 3 - 4)
8 Medium Strawberry
80g 70% Dark Chocolate
30g White Chocolate
Some toothpicks, optional

Method:
1. Gently rinse the berries with tap water then spread them out on a clean dish towel to dry
2. Dry completely before you start dipping and make sure not a drop of water should be left on the berries.
3. Chop/break the dark chocolate bar into small pieces, put the chocolate pieces in a small microwave safe dish.
4. Melt chocolate in the microwave, for about 1 minute at 20 minutes interval on medium power. (Give a quick stir at each interval to even out the melting process)
5. If it still did not melt, continue melting in 15 second increments in the microwave. Stir the chocolate. It should be smooth and have no lumps.(because sometime it depend on the voltage of your microwave)
6. Once the chocolate is melted, start dipping by cover about 2/3 of the strawberry with chocolate.(this looks prettier than covering the entire strawberry)
7. Put the dipped berries on some greaseproof paper and set them in the freezer for about 5 to 10 minutes before decorating it with the white chocolate.

Note:
~ If you are having difficulty holding the strawberry, skewer it just under the green bit with a toothpick just like what I have done in the photo shown above.
~ If you don't prefer white chocolate, you can used chopped nuts, shredded coconut, colour bits and etc to decorate your chocoberry.
~ These Chocoberry should be stored in the refrigerator and eaten at room temperature within 24 hours.


For snack, we will be having this “Strawberry Cupcake” which is made from Strawberry Milk and freshly diced Strawberry. The texture of the cupcake will be slightly moist due to adding of fresh strawberry and when put it near your mouth; you will be able to smell that sweet and fragrance strawberry milk aroma in it.

This simple recipe can bakes about 8 mini cupcakes within 30 minutes including the preparation and baking time. In this way, you can get everything ready and bake it just a few minutes before the guests arrive. I am sure they will be impressive by your little healthy “Strawberry Cupcake”.

Ingredients: (makes 8 mini cupcakes)
100g Cake Flour/Top Flour
1 Teaspoon Baking Powder
60g Caster Sugar
50g Butter, melted
1 Medium Egg
30ml Strawberry Milk
3 Medium Strawberry, diced
Extra Slices of Strawberry for topping, optional

Method:
1. Sieved the flour and baking powder together and set aside.
2. Use the electric beater, beat the egg and sugar till white and creamy.
3. Slowly add in the melted butter and continue to beat the mixture.
4. Next add in strawberry milk while the mixer still still beating, then gradually beat in the sieved flour mixture till well combined.
5. Use a spoon or spatula to stir in the diced strawberry and carefully not to over mixed it. (don't worry the mixture will be kind of gluey)
6. Spoon the mixture into the cupcake case till 3/4 full, top with a thin slice of strawberry and bake in a pre-heated 180 degree oven for about 15 minutes.
7. The surface of the cupcake will not be golden in colour so do not over baked it, test it with a skewer or toothpick check whether the center is cooked through.

Note:
~ You can replace Strawberry Milk with plain milk and 50g of butter with 50ml of corn/olive oil.
~ The texture of the cake will be slightly moist and the surface will be a bit sticky due to the adding of milk and fresh fruit.


Since today’s theme is “PinkyBerry High-Tea”, all the items we have will be based on Pink/Strawberry. So after some light refreshment and snack, we can relax and let go ourself in some heart to heart conversation with a pack or two of "Strawberry Flavour Pocky" to spice up the some discussion topics. Posted by Picasa


Friday, June 25, 2010

Seah's Herbal Chicken Soup

Soup! Most reader of this blog knows that I can't do without Soup and I love to boil soup. I believed a bowl of hot and comfort soup will make a great different for rainy days meal or even to revive your soul from tiring days at work. Chicken soup is always the best and comfort soup found in every home whereby you can see almost all the mothers will boil chicken essence/soup to strength our body and soul during our school time or staying up late at nights.

White Fungus - nourishes the Kidney, invigorates the Qi and benefits the Blood. It is also rich in iron, vitamin C, calcium and phosphorous. Its elastic protein and fibres also ease constipation, lower blood pressure and nourish the skin effectively.

As you have read from my posts, I have tried Seah's Bak Kuet Teh herb pack in one of my post a few months back. (click Here) To me, I feel that their quick and easy pre-packed herbs pack do easy the trouble of whipping out homecook soup in a easier way. Today I am going to share with you another type of their Soup Pack which is known as "Herbal Chicken Soup Spices" that will enable you to have comfort soup without storing up your pantry with different types of Chinese herbs.

Ingredients: (serves 3 - 4)
1 Packet of Seah's Herbal Chicken Soup Spices
3 Chicken Drumsticks
1 Small Can of Button Mushroom
1 Cluster of White Fungus
6 Red Dates
1/2 Tablespoon Wolfberries
1.2 Litre Boiling Water

Method:
1. Rinse and soaked the white fungus in warm water for about 10 - 15 minutes till soften, trim off the bottom stem and take only the soft portion. Rinse and let it soaked in water for another 15 minutes or so before cooking.
2. Clean and trim the fat of the chicken drumstick, blanched in boiling water, rinse and set aside.
3. Bring 1.2 Litres of water to boil, add in all the ingredients, except wolfberries. When the mixture comes to boil again, let it simmer for another 5 minutes before transfer it to the Slow-cooker and let it cook for at least 2 to 3 hrs on AUTO till the white fungus soften. OR
Alternatively you can simmer it on the stove for at least 45 minutes on medium low heat.
4. Serve hot with steam rice.


So you see with only 4 steps, anyone can whip up a pot of homecook chicken soup at anytime of the day. Just put everything into the slow-cooker, set the timer and within a few hours, you can enjoy a bowl of hearty comfort soup with your love one/family at home. Posted by Picasa


Thursday, June 24, 2010

St John the Baptist ~ Locusts and Honey

For the feast of St John the Baptist this year, we wanted to focus on the two staple foods he had lived on ~ locusts and honey.
I had bought last year a Nordic Ware Bee Hive Pan since I have a son born on the feast of St Ambrose (bee hive is one of his symbols) and I would say that this is one pan you can put to good use throughout the liturgical year as many saints were associated with bees..St Rita of Casica another and all the eloquent, "honey-tongued" preachers of the Church.

I used this lovely Carmel Banana cake recipe for the beehive, but any good cake recipe will do, of course a recipe that has honey in it, even more appropriate.
I poured the yellow icing sugar mixture over the top and made sure it ran down both sides to the bottom, so no join can be seen where the two halves are brought together. The bees are in the mold, you only need to colour the bees.
Here are some of our edible locusts, all lined up on our tray!

I bought some crunchy caramel sticks, they have that bit of 'crunch' like a locust would have as well as some 'ooze' (the caramel) they would have as well.

I cut each stick in half and made sure that I shaved a little more off to create an angle as you can see above.

I used one bag of pretzels.

So basically, it is the crunchy caramel stick, pretzels broken like you see above, pecans and a tube of black icing sugar.

My 'glue' to put the locusts together is icing sugar, a little water and yellow and red food dye to create an orange colour that goes well with the colour of the pretzels.

So I 'glued' a pecan on the back, for the locusts back wings folded together.

Then I 'glued' on the locusts legs.

Then 'glued' a peacan on the sloped front of the caramel stick for the head and with the black tube, created the pop eyes of a bug.

Awww, how can anybody eat that cute little critter?

Oh my goodness, a plague of them here!

They weren't an expensive endevour either, I bought the caramel sticks for $4 ~ that gave me up to 48 locusts. One bag of pecans, one bag of prezels, a little icing sugar and that was it!

Happy Feast Day!

St. Josemaria Escriva

Make Flan!
 ...The national dessert of Spain, home country of St. Josemaria...
I originally printed out this recipe to try.
You may want to try it!
In the meantime, this instant flan caught my eye at the the grocery store...
(I tried it ahead of time with the recipe above to use for Plan B)
Ingredients:
~This box and milk~
Now I'm no "flan connoisseur" but I thought it was delicious! 
~It was amazingly easy, which is the best part for those of us with limited time~
My only critique is that it was not as firm as I had expected.  
However, I used a jello mold for the nice shape and effect...So I'm not sure if this had something to do with the consistency.
Since this flan also came with carmel sauce, it would also be a yummy dessert to use for the feast of Our Lady of Mt. Carmel on July 16th!
~Just add whipped cream~
God Bless you on this special feast day!

Wednesday, June 23, 2010

In The News

I was recently contacted by Rome Reports for an interview. Before I had an opportunity to answer their questions (I'm constantly way behind with emails!)  they put together the following video.  I thought it turned out cute and wanted to share it with you all.   Thank you Rome Reports!


You can read the whole article here:
 Food Blog with a Catholic Touch 

Grasshopper Parfaits


If you are looking for an easy, throw-it-together-in-about-10-minutes-treat to celebrate the Solemnity of the Birth of St. John the Baptist (the only saint who gets to celebrate his birthday liturgically) then here is an idea for you. Grasshopper pies are refreshing in the summertime, but usually require chilling time. Grasshopper parfaits are ready to eat as soon as you like.

What you need:
instant chocolate pudding
milk
oreos
Andes Creme de Menthe baking bits
peppermint extract
green food coloring
whipped cream


Make the pudding according to package directions and set aside. Mix in 1/2 to 1 tsp. of peppermint extract.

Let your youngest child get all ninja-like on a bag of 15- 20 Oreos or just crush them yourself and mix with equal amount of Andes baking bits.

Add 8-10 drops of green food coloring to whipped cream. (I used Cool Whip because I needed to get it out of my freezer.)

Layer in a tall glass; pudding, whipped cream, and cookie mixture. Repeat. Chill, if you want to, or just serve!
Enjoy!

St. John the Baptist, cousin of Our Lord, pray for us!


Original recipe found at Allrecipes. This version includes my alterations.

Monday, June 21, 2010

Solemnity of the Birth of St. John the Baptist

June 24th
~Celebrating The Nativity of St. John the Baptist~ 
Read more about the Forerunner of Christ HERE and HERE
St. John the Baptist is often endeared for his humility.   He was humble in his actions, dress, and even through what he ate.
"John wore clothing made of camel's hair and had a leather belt around his waist.  His food was locusts and wild honey."~Matthew 3:4~

Try this St. John the Baptist Locust and Honey Snack!
Warning:  This is not the most "glamorous" snack...But that's exactly the point! 
It's a tad-bit messy but very simple, fun, and healthy too.

Ingredients:
2 celery stalks
Handful of mini pretzels
Peanut Butter
A few drizzles of honey
3-4 Large Marshmallows
Pinch of mini chocolate chips
1.  Clean and cut your celery stalks to use for the locust body
2.  Cut large marshmallows to size for the head (photo below)
3.  Spread celery with peanut butter and lightly coat marshmallows with peanut butter
4.  Use peanut butter to stick marshmallow head to celery body
5.  Break pretzels to form locust legs 
6.  Break pretzels for antennae and use peanut butter to stick (Sometimes using a toothpick to do this is easiest)
7. Place mini chocolate chips for locust eyes
8. Drizzle honey through the middle of the celery
9. Sprinkle with mini chocolate chips to finish
~Because of the detail work and trying to get the "parts" to stick, this snack may be difficult for children under 5 to make~
Our 2-year old voted "Yum!"
~It is with a humble heart that I thank Jessica for inviting me to post here occasionally.  I look forward to sharing the joys of our beautiful faith through liturgical celebrations.  God Bless all of you authors and readers!~

Celebrating the Two Hearts

This post was submitted by Lori, at Busy with Blessings, for publication here at Catholic Cuisine.   Both of these ideas were inspired by Mary's post: Appetizer for the Solemnity of the Sacred Heart.   Thank you Lori for sharing your lovely pictures with all of us!  

Recently we went to celebrate the baptism of a precious new gift from above given to dear friends of ours. I had offered to bring some snacks to share. Being that we were celebrating the feasts of The Sacred Heart of Jesus and The Immaculate Heart of Mary, I checked out Catholic Cuisine for ideas. I was thrilled to find these awesome and easy ideas!

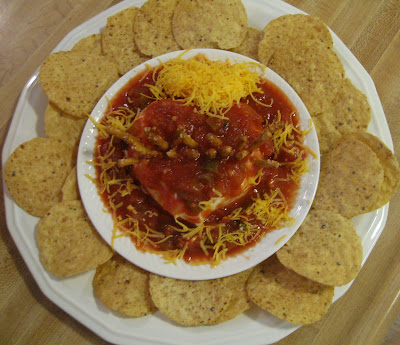
For the first tray, I hand shaped a block of cream cheese into a heart and placed on a small plate.  I then added salsa and broken pretzels to form the crown of thorns.  Next, I added shredded cheese for the flame coming out at the top.  I put the small plate onto a larger one and surrounded it with tortilla chips.  (Using the two plates keeps the chips from getting soggy.)


For the Immaculate Heart, I also hand molded a cream cheese heart. I put some pretty little artificial flowers across the center and placed a sword plastic toothpicks through the side. Ritz crackers surrounded this also in the form of a heart.


I think these both were a special addition to a beautiful day! Thanks again ladies for sharing your creativity with us all!

Sunday, June 20, 2010

Immaculate Heart Cake

This beautiful cake, in honor of the Immaculate Heart of Mary, was submitted by Amy Eastman from Tampa, Florida.  Thank you Amy! 


"I made this for the Memorial of the Immaculate Heart of Mary.   It was a heart-shaped angelfood cake with whipped cream icing, "rose" strawberries and orange rind "flames." I also used mint leaves for the leaves."

Note:  You can watch how to carve a rose from a strawberry here.

Immaculate Heart of Mary, whose sweet soul a sword pierced beneath the Cross, pray for us!

Saturday, June 19, 2010

Sacred and Immaculate Heart Cakes

This post was written by Tiffany, from Family at the Foot of the Cross. Since the month of June is dedicated to The Most Sacred Heart of Jesus, there is still time to make a cake (or any of the other treats in the archives) in honor of the Sacred Heart this month! Also, Tiffany is going to be joining us as a contributor here at Catholic Cuisine.  Welcome Tiffany!


~Sacred Heart of Jesus and Immaculate Heart of Mary Cakes~

We had fun making these cakes for the dual feasts of the Sacred & Immaculate Hearts! They were fairly easy with heart-shaped cake pans! These are special back to back feasts so we wanted to really celebrate these joyous occasions today and tomorrow. This link explains the Sacred Heart of Jesus. And this link explains the Immaculate Heart of Mary.

I was particularly struck by this statement from Catholic Culture: "How society, culture, economy, politics today need this Heart! It is really true, the more man distances himself from God-Love the more he becomes 'heartless', agitated about a thousand things because he has mislaid the principal one: to let oneself be loved by Christ and to respond to this Love with our love."  WOW, is this ever so true!


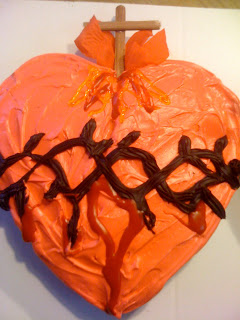
So with that in mind, back to the cakes of LOVE...  We started with the Sacred Heart of Jesus, representing how much He truly loves us.  We used red food coloring to die the white frosting, then used squeezable chocolate brownie topping for the weave of thorns...Finally, we added a bit of red icing for the blood He shed. Oh what a loving and merciful God!

After painting 2 small craft sticks brown, we glued them to a straw so that we weren't poking painted sticks into our edible cake! Silk flower petals (from the Dollar Tree) were glued on to the sticks to represent the flames. They looked like this:


Here you see the front of the Sacred Heart (straw) cross and flames and the back of the Immaculate Heart flames.  The straw was the only part that we stuck into the cake.


A close-up of the Immaculate Heart of Mary Cake
(We used the same idea of gluing the stick to the straw for the sword that pierced her heart.)


This is the picture that hangs over our home altar/prayer table...A nice visual reflection for these two special days.

"Behold the Heart which so loved mankind."
~ St. Margaret Mary Alacoque

"The heart that resembles that of Christ more than any other is without a doubt the Heart of Mary, His Immaculate Mother."
~ Pope Benedict XVI


One last thing... For another idea, here is a photo of some Immaculate Heart of Mary Rice Krispy Treats that we made in the past.

These were made following the recipe on the Rice Krispy box, mixed with a little red food coloring. I used a heart cookie cutter to cut them out and then just decorated with some squeezable frosting and sprinkles...super easy!

~Happy "Feasting" With Love~